· tutorials · 5 min read
Developing a Lightweight TUI Music Player in C# using Terminal.Gui (Part Three)
In part two of this guide, we refined our audio player and added some play, pause, and stop buttons. In Part Three, we’re going to go a step further and implement volume controls. However, before we do that, we’re going to refactor our program to make use of Dependency Injection (DI) in order to pave the way for cross-platform support.
In order to best follow along with this guide, I recommend checking out the sourcecode on Github and going through some of the commit history. The other sections of this guide are available here:
Part One | Part Two | Part Four
The Case for Dependency Injection
Until this project, I hadn’t fully grasped the concept of Interfaces or Dependency Injection. I had read about them a number of times, but didn’t see the benefits as the types of programs I was writing were fairly small and didn’t really need Interfaces. That all changed however, when I realized that the NAudio library I’m using in MusicSharp isn’t cross platform and depends on the Windows API. Upon this realization, I soon began to see how abstracting the audio player class in an interface would allow me to inject platform-specific players into MusicSharp depending on the OS!
The first step in the process was to refactor the code from part two, and I did so by separating it into a logical folder structure which was:
- src
- model
- view
I then created Gui.cs inside of the view folder to house the TUI elements, and IPlayer.cs and Winplayer.cs inside the model folder for the music player methods. Starting with IPlayer, I started thinking about the methods common to all player implementations. Using the current application as a guide, I first needed to implement methods to pause, play, and stop the audio playback, as well as an auto-property to store the name of the last file opened:
public interface IPlayer
{
    /// <summary>
    /// Gets or sets the last file opened by the player.
    /// </summary>
    string LastFileOpened { get; set; }

    /// <summary>
    /// Method to play audio.
    /// </summary>
    /// <param name="path">The filepath of the audio file to play.</param>
    void Play(string path);

    /// <summary>
    /// Method to pause audio playback.
    /// </summary>
    void Pause();

    /// <summary>
    /// Method to stop audio playback.
    /// </summary>
    void Stop();
}
With these methods in place, I next opened up the WinPlayer class in order to work on the Windows implementation of the player. Using most of what I had already written in part two of this guide, I created the class without too much issue. The code is a bit long to paste here, but you can see this version of Winplayer.cs on Github.
Armed with a working implementation of IPlayer, the next step of the process was to use Dependency Injection to inject Winplayer into the Gui class, and I chose to do so using constructor injection. At the top of the Gui class, I wrote the following code:
public class Gui
{
    /// <summary>
    /// Create a new instance of the audio player engine.
    /// </summary>
    private readonly IPlayer player;

    /// <summary>
    /// Initializes a new instance of the <see cref="Gui"/> class.
    /// </summary>
    /// <param name="player">The player to be injected.</param>
    public Gui(IPlayer player)
    {
        this.player = player;
    }
Here, a new instance of IPlayer is created, and then is initialized using the Gui constructor. This now makes it very easy to swap out depending on the platform.
Volume Controls
With the refactor complete, the next step was to implement some additional playback controls - volume buttons! The credit for this actually goes to Github user marijnz0r who graciously submitted a PR to the project!
As volume controls are necessary on all audio player implementations, the first thing was to add two new volume methods to IPlayer, IncreaseVolume() and DecreaseVolume():
/// <summary>
/// Method to increase audio playback volume.
/// </summary>
void IncreaseVolume();

/// <summary>
/// Method to decrease audio playback volume.
/// </summary>
void DecreaseVolume();
Rather than a slider, the volume controls are implemented as buttons. Inside the Winplayer class, our two methods adjust the volume of the outputDevice like so:
public void IncreaseVolume()
{
    // Use this construct to prevent edge cases going over 1.0f
    // This is caused by using floats in WaveOutEvent
    if (this.outputDevice.Volume > 0.9f)
    {
        this.outputDevice.Volume = 1.0f;
        return;
    }

    this.outputDevice.Volume += 0.1f;
}

/// <summary>
/// Method to decrease audio playback volume.
/// </summary>
public void DecreaseVolume()
{
    // Use this construct to prevent edge cases going under 0.0f
    // This is caused by using floats in WaveOutEvent
    if (this.outputDevice.Volume < 0.1f)
    {
        this.outputDevice.Volume = 0.0f;
        return;
    }

    this.outputDevice.Volume -= 0.1f;
}
The final step was to wire up the buttons to the view inside a frame in our Gui class along with the other playback controls by using lambdas:
var increaseVolumeButton = new Button(55, 0, "+ Volume");
increaseVolumeButton.Clicked += () =>
{
    this.player.IncreaseVolume();
};

var decreaseVolumeButton = new Button(55, 2, "- Volume");
decreaseVolumeButton.Clicked += () =>
{
    this.player.DecreaseVolume();
};
Running the code at this stage produces the player buttons. Here’s a screenshot of a slightly later build featuring a statusbar in addition to the playback controls:
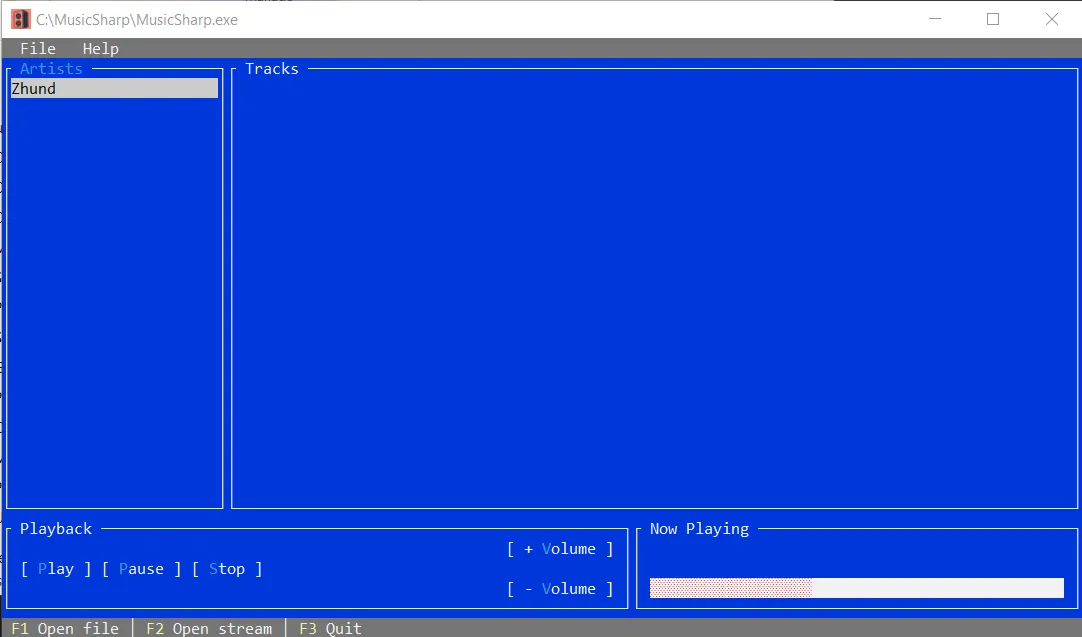
Success!
Closing notes
In part three, we’ve gone a long way towards creating a more fully-fledged audio player. By refactoring to use Dependency Injection, our code is less tightly coupled, making it easier to test and write implementations for other platforms. Moreover, by adding volume controls, our player now supports enough basic playback features to make it somewhat useable. More importantly for me however, is the knowledge that I’ve been able to acquire in working on the program. Its important to practice coding as much as possible (ABC - Always Be Coding!), and this project has been integral to solidifying my understanding of interfaces and Dependency Injection. Be sure to stay tuned for the fourth and final version of this guide as I plan to implement a way to load playlists and display playback state!