· tutorials · 5 min read
Developing a Lightweight TUI Music Player in C# using Terminal.Gui (Part Two)
Since the last part of this guide, I’ve been working quite a bit on refining the program structure before going forward. I ended up finding some sample code from NAudio’s author which documented how to manage Naudio’s lifecycle in a GUI application (close enough! :-P) and based my model on that going forward. In addition, you can find the other parts of the guides here:
Part One | Part Three | Part Four
After making a test branch in Git, I made some major modifications to the code, namely getting rid of the Player class and renaming Gui.cs to Player.cs. With these changes in place, we now have a simple player which plays a preset audio file. Let’s go one level further by Implementing some actual playback controls!
Before we do so however, let’s start by adding a file open dialog to our existing File—Open dialog. This will come in handy when we create the play button later on. In order to better follow along, I recommend you take a look at this commit on Github (and support the project with a star!).
Adding an Open File dialog
In this next step, we’re going to implement an open file dialog so that the user can select an audio file to load into the player.
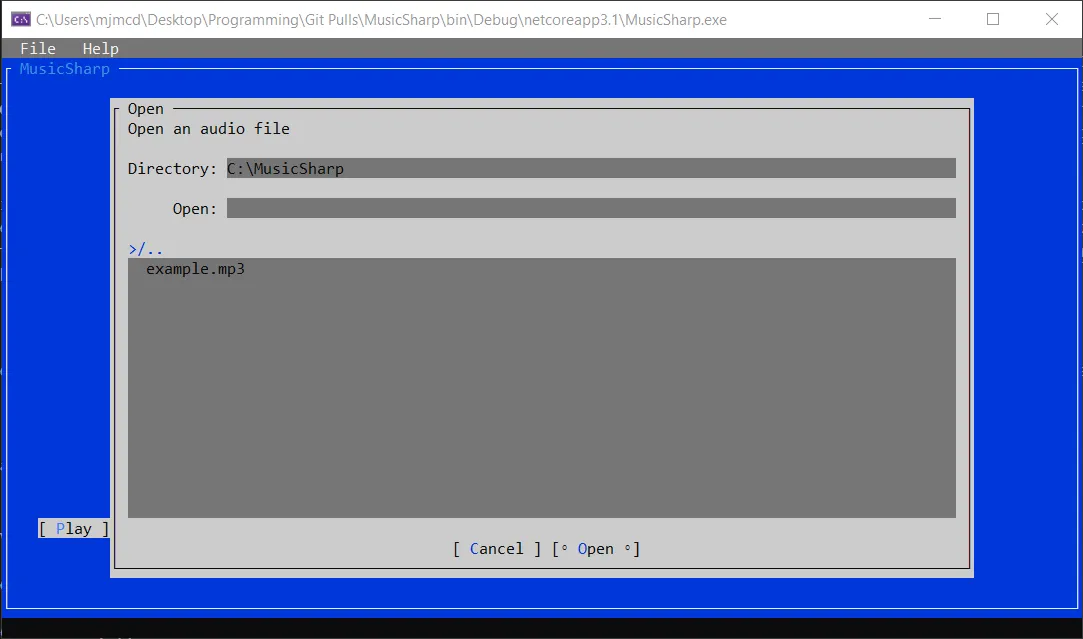
Inside Player.cs, I created a new OpenFile method, and wired it up to a Terminal.UI OpenDialog() call like this:
 private void OpenFile()
{
    // Create a new open dialog<img src="/img/posts/music-sharp/MusicSharp-open-dialog.png" width="750" height="402" alt="MusicSharp open file dialog">
        this.lastFileOpened = d.FilePath.ToString();

        // Pass the chosen path to the player as a string
        this.Play(d.FilePath.ToString());
    }
}
The code above runs the GUI element, and if the open button is pressed, pass the path string to the Play() method, which should look like this:
// Start playing audio
private void Play(string path)
{
    if (this.outputDevice == null)
    {
        this.outputDevice = new WaveOutEvent();
        this.outputDevice.PlaybackStopped += this.OnPlaybackStopped;
    }

    if (this.audioFile == null)
    {
        try
        {
            this.audioFile = new AudioFileReader(path);
            this.outputDevice.Init(this.audioFile);
            this.outputDevice.Play();
        }
        catch (System.Runtime.InteropServices.COMException)
        {
        }
    }

    if (this.audioFile != null)
    {
        try
        {
            this.outputDevice.Play();
        }
        catch (System.Runtime.InteropServices.COMException)
        {
        }
    }
}
Here, a series of if statements decide the state the player is in and what actions need to occur for the player to be initialized. Next, you’ll need to create an OnPlaybackStopped event handler in order to dispose of the audio file and output once playback has finished. However,
// Dispose of our device and audioFile once playback is stopped.
// These will be changed in the future as we might want to allow
// users to carry on playback from where they left off.
private void OnPlaybackStopped(object sender, StoppedEventArgs args)
{
    this.outputDevice.Dispose();
    this.outputDevice = null;

    // this.audioFile.Dispose();

    // By resetting the audioFIle position to 0, playback can start again.
    // this.audioFile.Position = 0;
    //   this.audioFile = null;
}
Note that I’m only calling some of the methods, as I don’t want to dispose of the last file played. I left the others in to give others an idea of what’s possible for your own implementation.
Next, near the top of my player class, I added the following property to keep track of the last file that was opened:
private string lastFileOpened;
```
Now that the groundwork is in place, the next thing to do in part two is to implement some playback controls, namely Play, Stop, and Pause. First we'll implement the backing methods:
```csharp
// Start playing audio
private void Play(string path)
{
if (this.outputDevice == null)
{
this.outputDevice = new WaveOutEvent();
this.outputDevice.PlaybackStopped += this.OnPlaybackStopped;
}
if (this.audioFile == null)
{
try
{
this.audioFile = new AudioFileReader(path);
this.outputDevice.Init(this.audioFile);
this.outputDevice.Play();
}
catch (System.Runtime.InteropServices.COMException)
{
}
}
if (this.audioFile != null)
{
try
{
this.outputDevice.Play();
}
catch (System.Runtime.InteropServices.COMException)
{
}
}
}
// Pause our audio player
private void Pause()
{
try
{
this.outputDevice?.Pause();
}
catch (System.NullReferenceException)
{
}
}
Our Play() method takes a string filepath, which we then use to load the audioFile. I’ve also implemented some exception handling to catch certain cases which may come up during use.
Lastly, I created the buttons in the GUI and wired them up to the model. In the case of the play button, I check to see if a file has already been loaded, and if one hasn’t then play opens the GUI dialog.
var stopBtn = new Button(24, 22, "Stop");
stopBtn.Clicked += () =>
{
    this.Stop();
};

var playBtn = new Button(3, 22, "Play");
playBtn.Clicked += () =>
    {
        if (this.lastFileOpened != null && this.outputDevice != null)
        {
            try
            {
                this.outputDevice.Play();
            }
            catch (System.NullReferenceException)
            {
            }
        }
        else
            {
                this.OpenFile();
            }
        };

var pauseBtn = new Button(13, 22, "Pause");
pauseBtn.Clicked += () =>
    {
        this.Pause();
    };

    win.Add(playBtn, stopBtn, pauseBtn);
Running the program at this point should create a GUI featuring some working playback controls:
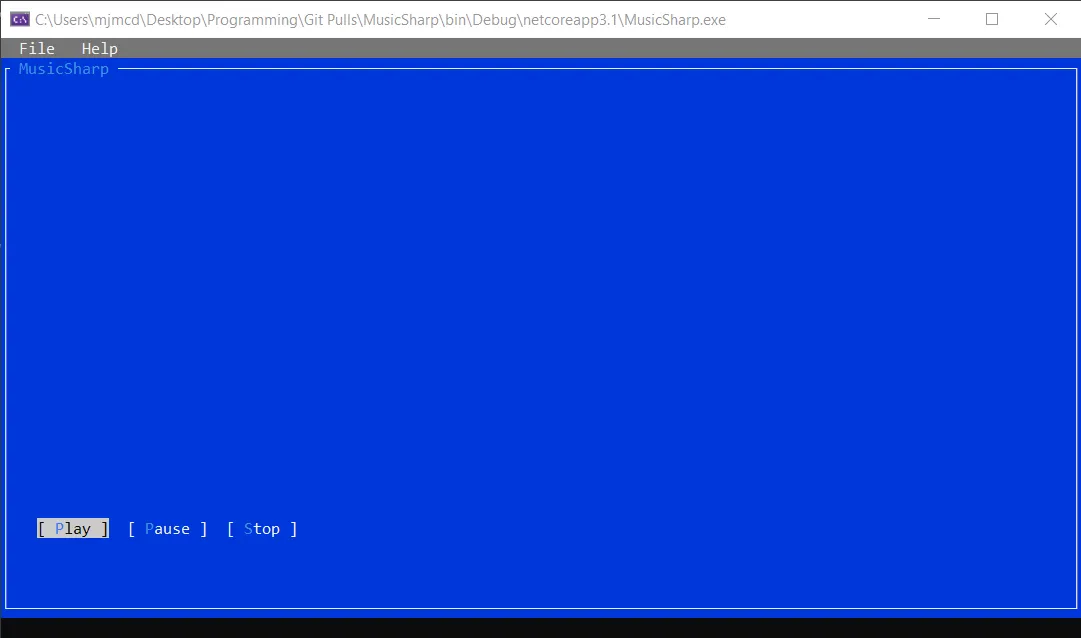
Success! We now have an audio player capable of opening files and then playing, pausing, and stopping them without running into any errors. The placement of the buttons is temporary at the moment, and once I have some additional UI elements working I plan to group them all together. Make sure to check out part three of this series as I’ll be implementing Dependency Injection as well as volume buttons!