· tutorials · 8 min read
Building a Browser-Based Music Synthesizer with React
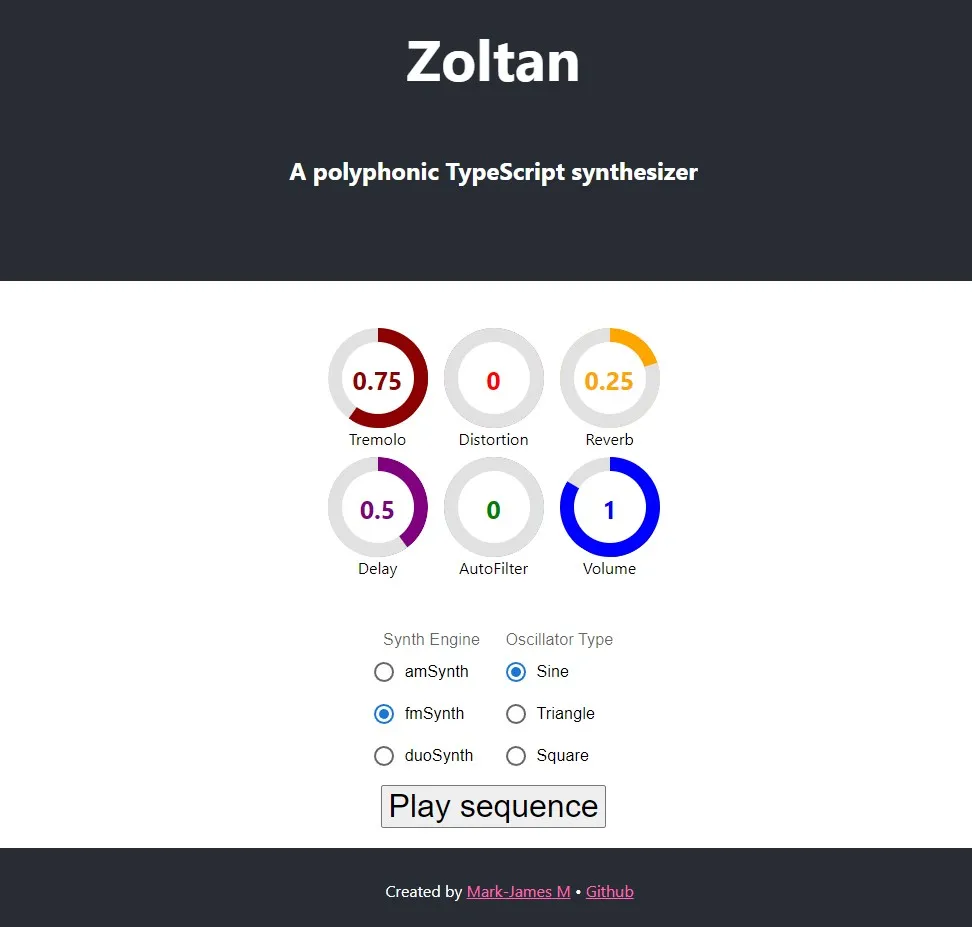
Recently, I’ve been learning React in order to see how it compares with the ASP .NET that I write at work. As I enjoy working on projects that overlap with my interests (music production being a hobby), I decided to brush up on my TypeScript skills and learn React at the same time by building a browser-based music synthesizer called Zoltan (Github repo). The project is still in an early alpha stage, but an audio synthesizer makes a good fit for a Single Page Application (SPA). By the end of part one, you will have a simple synthsizer that looks like the following:
A live demo is available here. One caveat is that at the time of writing, there is an audio bug when attempting to play the synthesizer on iOS (and possibly Android too).
Getting Started
The first thing I needed to do was decide on which tech stack to use. Aside from React, I also decided to use the following libraries:
- Material UI: For component UI design.
- Styled Components - For writing CSS from within Javascript.
- React Dial Knob - A great component to model synth knobs with.
- React Bootstrap - For using Bootstrap with React syntax.
- Reactronica: An awesome library which “aims to treat music as a function of state, rendering sound instead of UI.”
UI Mockups
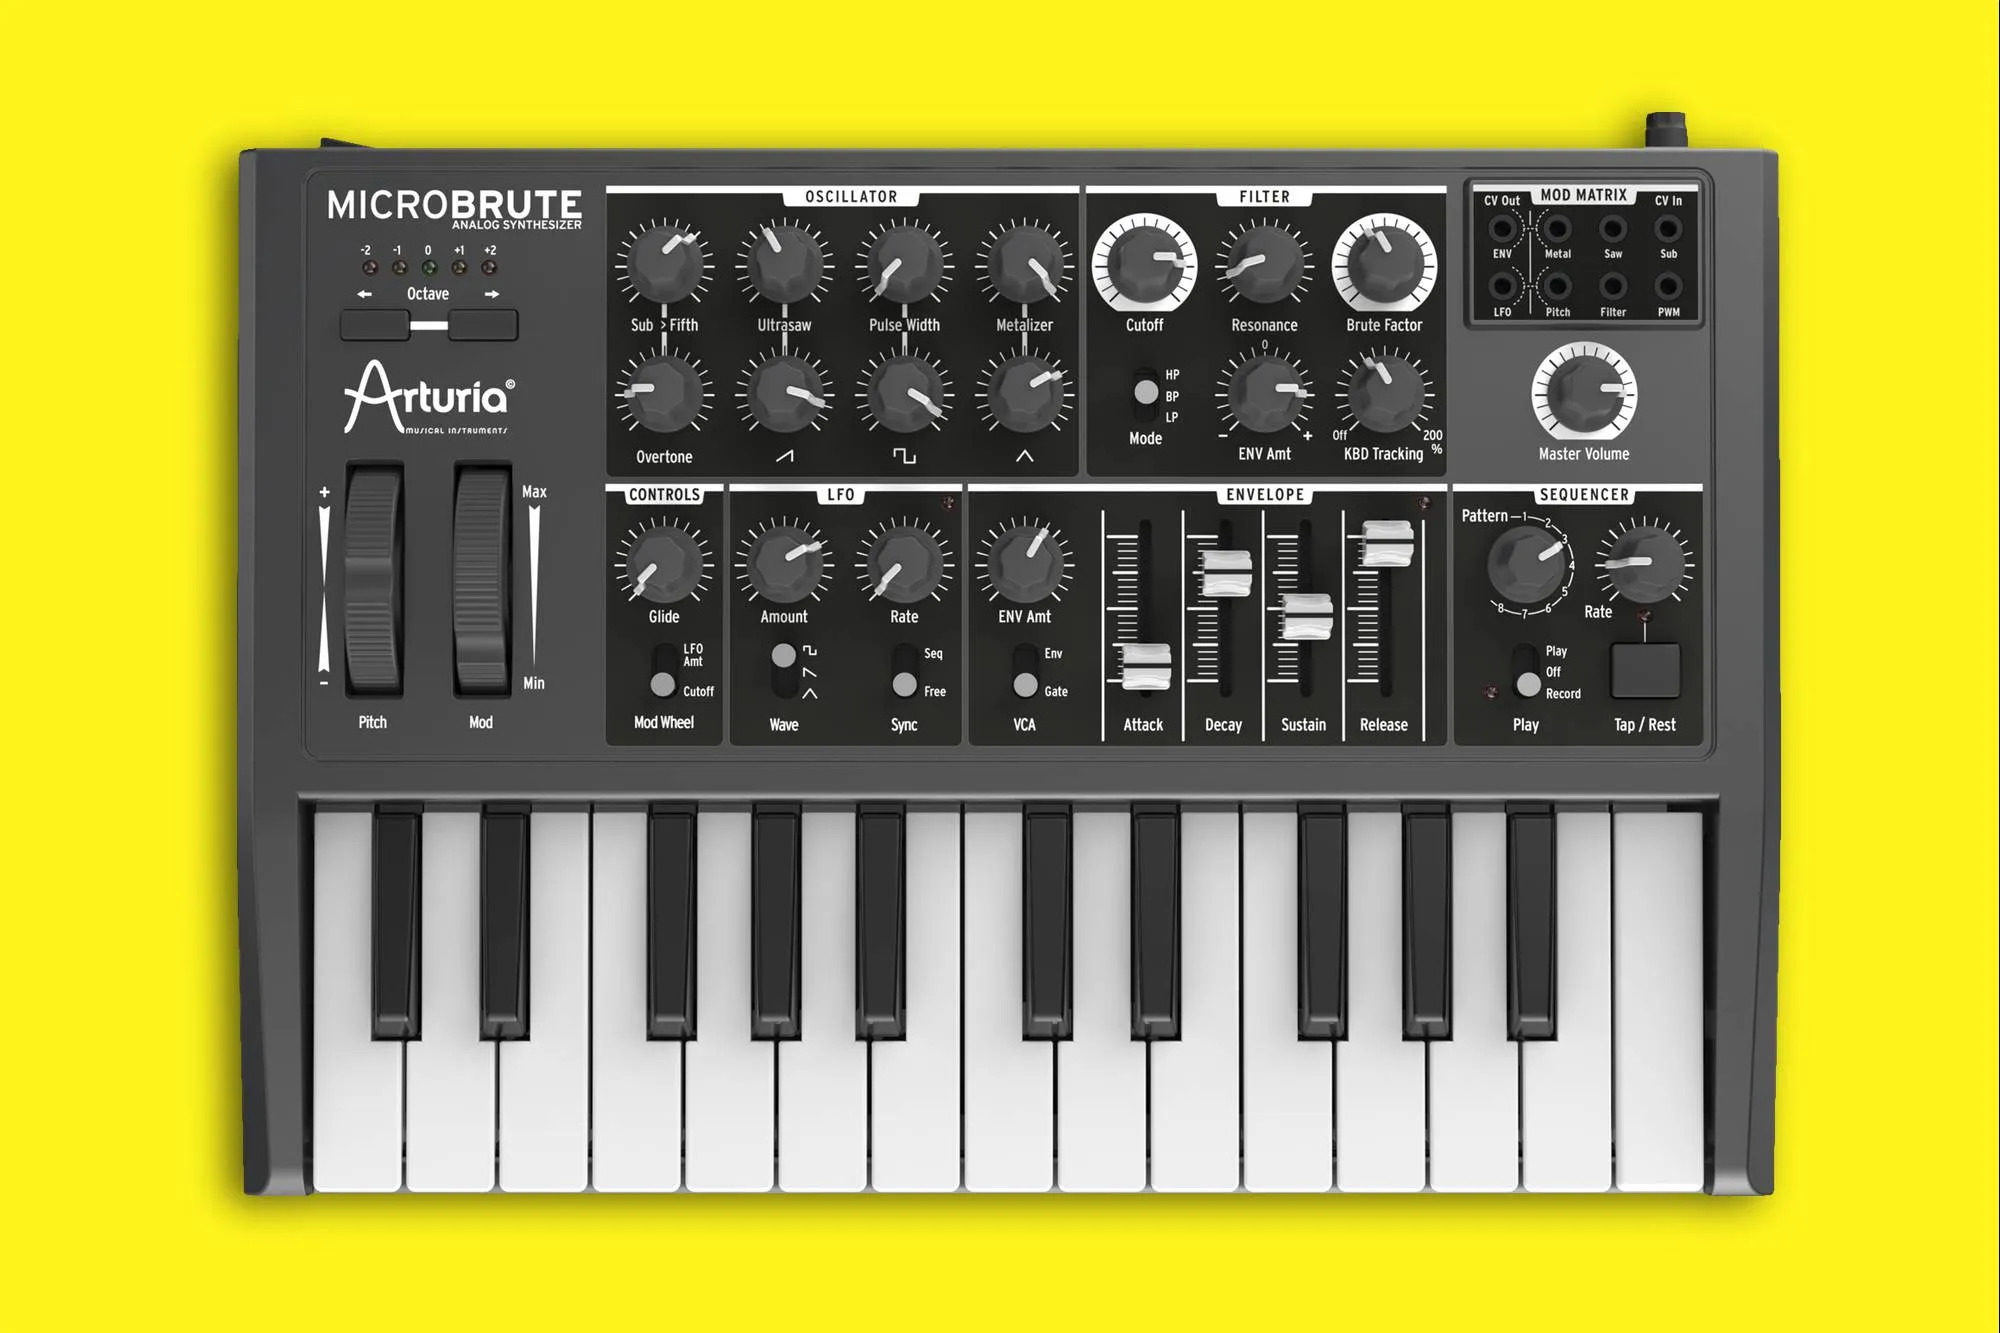
With the libraries chosen, the next step was to create a UI model and then implement it in react. Typically, a physical synthesizer will have modulation and control knobs at the top, and/or piano keys and a sequencer at the bottom. Take the Arturia Microbrute for example:
In thinking about the layout, I sketched a relatively simple mobile-first UI mockup demonstrating how I would setup the Zoltan layout:
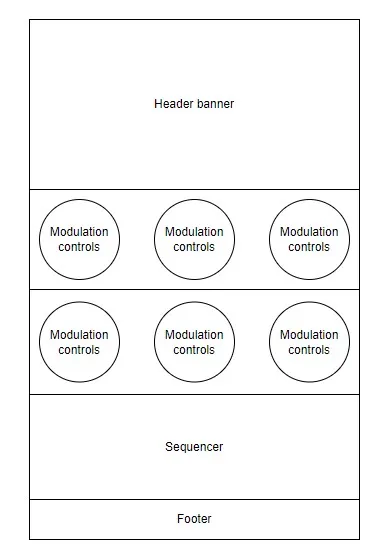
It is very possible that there may be a few extra control rows, but for now this is a good start.
Creating the App
Reactronica offers a handy installation template, and this can be installed by running:
npx create-react-app zsynth --template reactronica
inside a new project folder.
The next step was to replace the generated App.js code with the following:
import React from 'react';
import './App.css';
import styled from 'styled-components'
import SynthEngine from './SynthEngine';
import Footer from './Footer';

// Set the button colors using styled-components
const H2 = styled.h2`
  font-size: 24px;
`

function App() {
  return (
    <div className="App">
      <header className="App-header">
        <h1>Zoltan</h1>
        <H2>A polyphonic TypeScript synthesizer</H2>
      </header>
      <SynthEngine />
    <Footer />
    </div>
  );
}

export default App;
This won’t quite run yet (we haven’t created the SynthEngine and Footer components), but I’d like to point out the following snippet:
<H2>A polyphonic Javascript synthesizer</H2>
This isn’t a standard H tag, but one created by me using Styled-Components:
const H2 = styled.h2`
  font-size: 24px;
`
This is a really handy feature, as it means that you can alter components that override the base styles on a per-component basis. Another thing to point out is that I’m using functional components as opposed to classes throughout the project.
Developing the Synth Engine
The synth engine is the core of our application, and makes use of the Reactronica library to create sound. Reactronica itself acts as an abstraction over Tone.js which is what actually produces sound. To start working on the synth engine, create a new file in the src/ folder called SynthEngine.js and paste in the following code:
import React, { useState } from 'react'
import { Song, Track, Instrument, Effect } from 'reactronica';
import { Donut } from 'react-dial-knob'
import Stack from '@mui/material/Stack';
import FormControl from '@mui/material/FormControl';
import FormLabel from '@mui/material/FormLabel';
import RadioGroup from '@mui/material/RadioGroup';
import FormControlLabel from '@mui/material/FormControlLabel';
import Radio from '@mui/material/Radio';

function SynthEngine() {

  {/* Declare our state variables */ }
  const [isPlaying, setIsPlaying] = React.useState(false);
  const [volume, setVolume] = useState(0)
  const [delayAmount, setDelayAmount] = useState(0)
  const [distortionAmount, setDistortion] = useState(0)
  const [steps] = useState([
    ['C3', 'E3', 'A3'],
    null,
    ['C3', 'E3', 'G3', 'B3'],
    null,
    ['C3', 'F3', 'A3'],
    null,
    ['D3', 'G3', 'B3'],
    null,
  ]);
  const [synthType, setSynthType] = useState('amSynth')

  return (
In the top nine lines we’ve imported the necessary libraries into our project. Next, we create the SynthEngine() function and set some state variables (volume, isPlaying, delayAmount, and DistrortionAmount). The final state item (steps) is an array of arrays where we can store some music chords.
Inside the SynthEngine() return, we start by placing some Reactronica code which defines the synthesizer:
<>
    <Song isPlaying={isPlaying}>
        <Track
            steps={steps}
            volume={volume}
        >
          <Instrument type={synthType} />

          {/* Setup our effect chain */}
          <Effect type="distortion" wet={distortionAmount} />
          <Effect type="feedbackDelay" wet={delayAmount} />
        </Track>
    </Song>
We make use of the <></> tags to act as a container that holds our component code (the closing tag appears at the bottom of the component). Next, we create a song which “wraps around all Reactronica components, providing top level control of the audio.” The song has an isPlaying property which we will set later to control the stopping and starting of audio. Next, we see a <Track> component, and as the documentation states, “Tracks make up the layers of audio within a Song. Each Track has independent volume, pan, and mute controls. Pass steps through to play a sequence.” Next comes the Instrument, which is “wrapped by a Track and becomes its audio source. Either a type of browser-based synth, or a sampler that plays audio samples.” The final two items are distortion and delay effects. Notice how the the volume, instrument, and effects are all wired in to their respective state variables.
Fleshing out the UI
Now that we have a basic signal chain, we can now think about adding the control knobs, and this is done by using the aforementioned React Dial Knob library. Below the <Song> tag, add the following code:
<Stack spacing={2} direction="row" sx={\{ mb: 1 \}} alignItems="center" className='CenterAlign'>
    <Donut
        diameter={100}
        min={-50}
        max={10}
        step={1}
        value={volume}
        theme={\{
            donutColor: 'blue'
            donutThickness: 14
        \}}
        onValueChange={setVolume}
        ariaLabelledBy={'volume'}
        >
        <label id={'volume'}>Volume</label>
    </Donut>

    <Donut
        diameter={100}
        min={0}
        max={1}
        step={.25}
        value={delayAmount}
        theme={\{
          donutColor: 'purple'
          donutThickness: 14
        \}}
        onValueChange={setDelayAmount}
        ariaLabelledBy={'delay-amount'}
    >
        <label id={'delay-amount'}>Delay Amount</label>
    </Donut>

    <Donut
        diameter={100}
        min={0}
        max={1}
        step={.25}
        value={distortionAmount}
        theme={\{
          donutColor: 'red'
          donutThickness: 14
        \}}
        onValueChange={setDistortion}
        ariaLabelledBy={'delay-amount'}
    >
        <label id={'delay-amount'}>Distortion</label>
    </Donut>
</Stack>
Here we stack the buttons and set their values and onValueChange properties to the corresponding effect. For demo purposes I’ve only included three knobs, but feel free to add more to match the screenshot above (make sure to bind the effects to a state variable and add them to the effects chain) as it would be good for practicing. Next, we need a way to let users select between different synth engines, and for this I felt a radio button group would be appropriate:
<br />
<br />

<Stack alignItems="center" className='CenterAlign'>
    <FormControl component="fieldset">
        <FormLabel component="legend">Synth Engine</FormLabel>
        <RadioGroup
            aria-label="synth-engine"
            defaultValue="amSynth"
            name="radio-buttons-group"
        >
        <FormControlLabel value="amSynth" control={<Radio onClick={() => setSynthType('amSynth')} />} label="amSynth" />
        <FormControlLabel value="fmSynth" control={<Radio onClick={() => setSynthType('fmSynth')} />} label="fmSynth" />
        <FormControlLabel value="monoSynth" control={<Radio onClick={() => setSynthType('monoSynth')} />} label="monoSynth" />
        </RadioGroup>
    </FormControl>
<br />
The final element in the SynthEngine is a button so that we can start/stop the chords from playing:
    <br />
    <button
    style={{
        fontSize: '2rem',
    }}

    onClick={() => {
        setIsPlaying(!isPlaying);
    }}
    >
    {isPlaying ? 'Stop' : 'Play sequence'}
    </button>

    <br />
    <br />
    <br />

    </Stack>
    </>
    );
}

export default SynthEngine;
Here, the button checks if the synth is playing or not and shows the appropriate start/stop text. At the moment the button is a placeholder for what will be a more full-fledged step sequencer in future iterations.
Lastly, we can create a sticky footer by adding the following code inside the footer:
import React from "react";

const Footer = () => (
  <div className="footer footer-text">
    <p>Created by <a href="https://markjames.dev" text-color="white">Mark-James M</a> • <a href="https://github.com/markjamesm/zoltan">Github</a></p>
  </div>
);

export default Footer;
You should also add the following CSS to your index.css file for styling the footer:
.footer{
  margin-top: 1rem;
  padding: 1rem;
  background-color: #282c34;
  position: fixed;
  bottom: 0;
  left: 0;
  width: 100%;
}

.footer-text{
  color: white
}
With this code in place, you should now be able to see Zoltan running in your browser! You can also refer to (or fork!) the full codebase on Github.
TypeScript Conversion
After writing this article, I decided to convert the project over to TypeScript as I prefer working with types while programming (and as practice for converting projects in general). The first step is to install TypeScript using:
npm install --save typescript @types/node @types/react @types/react-dom @types/jest
Next, create a new file called tsconfig.json and add the following lines:
{
    "compilerOptions": {
      "target": "es2017",
      "lib": [
        "dom",
        "dom.iterable",
        "esnext"
      ],
      "allowJs": true,
      "skipLibCheck": true,
      "esModuleInterop": true,
      "allowSyntheticDefaultImports": true,
      "strict": true,
      "forceConsistentCasingInFileNames": true,
      "module": "esnext",
      "moduleResolution": "node",
      "resolveJsonModule": true,
      "isolatedModules": true,
      "noEmit": true,
      "jsx": "react",
      "noImplicitAny": false
    },
    "include": [
      "src"
    ]
  }
Note the use of noImplicitAny here which we’re using as a workaround because there is no types file for Reactronica on npm.
Finally, rename your .js files with .tsx and then build the project using npm start. You can delete the serviceWorker.js if you’d like (make sure to also remove any references to it in your index.js as well) as we don’t need it for now. For a quick and easy solution, you can also checkout this commit where I finished up the migration to TypeScript.
Conclusion
In this guide, we’ve taken a look at how to go about creating a simple music synthesizer using React (with functional components) and then converted the project over to TypeScript. In terms of next steps, it would be interesting to see how we can extend the sequencing capabilities of our synthesizer to create new and interesting rhythms!