· tutorials · 12 min read
Securing an ASP .NET Core Web API using JWT and Role-based Authorization
Recently, I’ve been developing a web API using ASP .NET Core 8. The developer experience has been great and things are progressing nicely, but it did take me some time to understand how to implement a JWT token authorization scheme with support for user roles. By the time you finish this guide, you will have the following endpoints:
- POST
/api/register- Registers a new user account - POST
/api/login- Authenticates your email & password and returns a JWT bearer token. - POST
/api/pages/create- Creates a new page. You must provide a valid JWT token - GET
/api/pages- Returns a list of all pages - GET
/api/pages/{id}- Returns a single page
You can also view the example repository here. Feel free to give it a star if you find it helpful!
Note: ASP .NET Core 8 also comes with new Identity endpoints which can make it easier to implement authorization for SPA and mobile apps. I haven’t yet explored the new endpoints, but, I do recommend reading developer Andrew Lock’s article about why you shouldn’t use them yet.
Preamble
JWT token based authorization has several benefits, but also a few drawbacks. For example, it can be difficult to invalidate tokens once issued (one solution is to use a blacklist), so it is important that they have a short expiration time (you can use refresh tokens to prolong the expiration time, and this will be covered in another article). A second potential issue with the JWT role-based approach is if you remove a role (removing an admin role) from a user for example, the changes will only take effect once when the current token regenerates. The client doesn’t need to wait for expiration to renew the token or re-authenticate. To this end, you can use flags within your apps to trigger clients to re-authenticate, such as when there are changes to roles, policies, or the individual user’s properties.
Understanding the Authentication and Authorization Flows
The first step in securing our ASP .NET Core Web API is to understand the authorization flows, and to do this I’ve created a simple diagram:
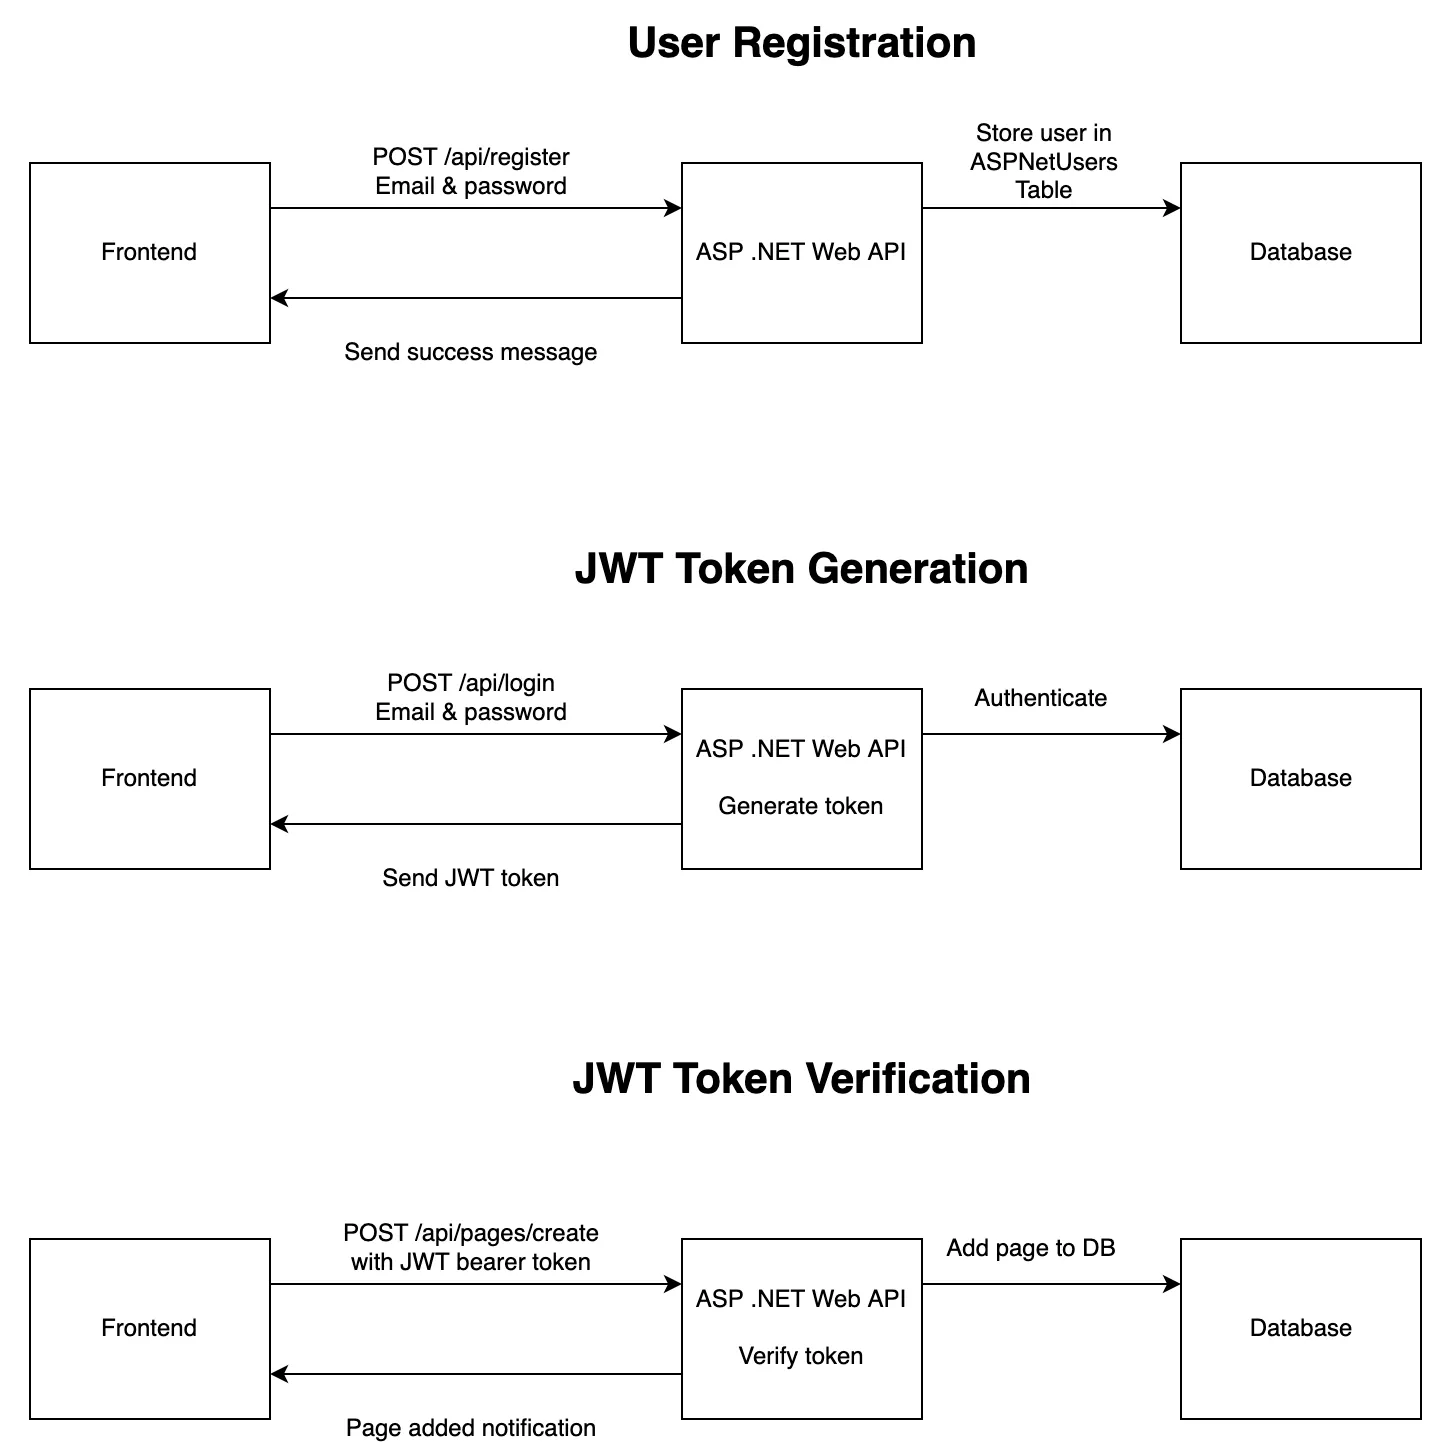
Here, you can see that when a user creates an account, our server will store the account inside the AspNetUsers table. Later, when we POST to the login endpoint, our application will verify the user and generate a bearer token which can be used to authorize a user. Lastly, once we POST to the /api/pages/create endpoint, the server will verify the bearer token before saving the post.
First Steps
To get started with authorization, first create a new ASP .NET Core Web API application. Next, add the following to the top of your appsettings.json:
  "SiteSettings": {
    "AdminEmail": "example@test.com",
    "AdminPassword": "administrator"
  },

  "JwtTokenSettings": {
    "ValidIssuer": "ExampleIssuer",
    "ValidAudience": "ValidAudience",
    "SymmetricSecurityKey": "fvh8456477hth44j6wfds98bq9hp8bqh9ubq9gjig3qr0[94vj5",
    "JwtRegisteredClaimNamesSub": "345h098bb8reberbwr4vvb8945"
  },
This will allow us to reference these variables from within our project. Note that in a production app you would want to store this information in a secrets file, but for purposes of this example appsettings is fine.
Next, add the following packages to the project using Nuget:
- Microsoft.AspNetCore.Authentication.JwtBearer
- Microsoft.AspNetCore.Identity.EntityFrameworkCore
- Microsoft.AspNetCore.Identity
- Microsoft.EntityFrameworkCore
- Microsoft.EntityFrameworkCore.Design
- Microsoft.IdentityModel.Tokens
- Asp.Versioning.Mvc
- Npgsql.EntityFrameworkCore.PostgreSQL
Afterwards, delete everything inside Program.cs. Once you have an empty file, we will add the builder and then configure Swagger so that we can use a bearer token. Paste the following code into Program.cs:
using System.Text;
using System.Text.Json.Serialization;
using JwtRoleAuthentication.Data;
using Microsoft.AspNetCore.Authentication.JwtBearer;
using Microsoft.AspNetCore.Identity;
using JwtRoleAuthentication.Models;
using Microsoft.EntityFrameworkCore;
using Microsoft.IdentityModel.Tokens;
using Microsoft.OpenApi.Models;
using JwtRoleAuthentication.Services;


var builder = WebApplication.CreateBuilder(args);

// Add services
builder.Services.AddControllers();
builder.Services.AddEndpointsApiExplorer();

builder.Services.AddSwaggerGen(option =>
{
    option.SwaggerDoc("v1", new OpenApiInfo { Title = "Test API", Version = "v1" });
    option.AddSecurityDefinition("Bearer", new OpenApiSecurityScheme
    {
        In = ParameterLocation.Header,
        Description = "Please enter a valid token",
        Name = "Authorization",
        Type = SecuritySchemeType.Http,
        BearerFormat = "JWT",
        Scheme = "Bearer"
    });
    option.AddSecurityRequirement(new OpenApiSecurityRequirement
    {
        {
            new OpenApiSecurityScheme
            {
                Reference = new OpenApiReference
                {
                    Type=ReferenceType.SecurityScheme,
                    Id="Bearer"
                }
            },
            new string[]{}
        }
    });
});
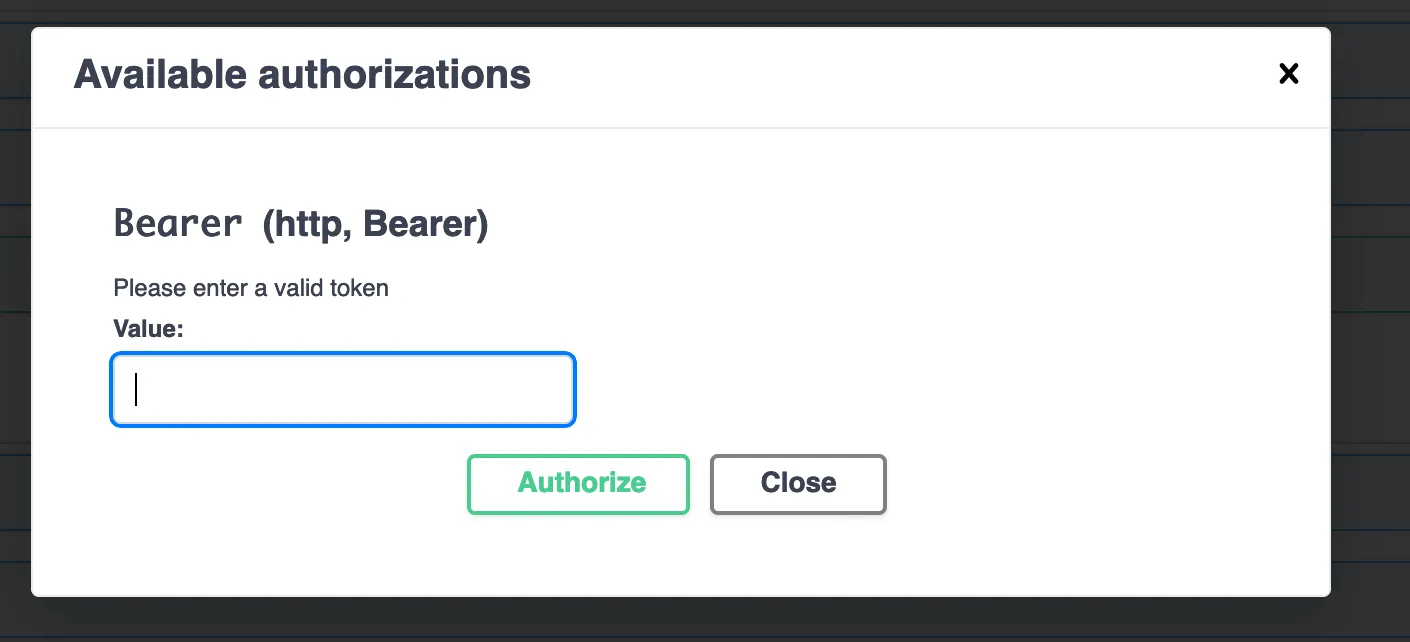
You will see several errors as we have not yet implemented all functionality, but the code above creates a new builder and configures Swagger so that you can enter a bearer token and have it be automatically passed to endpoints which require registration:
Next, add the following to the bottom of Program.cs:
builder.Services.AddProblemDetails();
builder.Services.AddApiVersioning();
builder.Services.AddRouting(options => options.LowercaseUrls = true);

// Add DB Contexts
// Move the connection string to user secrets for a real app
builder.Services.AddDbContext<ApplicationDbContext>(opt => opt.UseNpgsql("Host=localhost;Database=postgres;Username=postgres;Password=devpass"));
Now we’ve added some additional services to our app, including a new DBContext. For purposes of this example I’m using Postgresql, but any database will work.
Create Model Classes
Before we continue adding to our program.cs, we need a few helper classes and an enum. Firstly, create a new Role.cs file inside of an Enums folder:
namespace JwtRoleAuthentication.Enums;

public enum Role
{
    Admin,
    User
}
This enum will be used to keep track of which user types we want to have.
Next, we’re going to extend the IdentityUser class to add a new Role type. Paste the following inside of Models/ApplicationUser.cs:
using JwtRoleAuthentication.Enums;
using Microsoft.AspNetCore.Identity;

namespace JwtRoleAuthentication.Models;


public class ApplicationUser : IdentityUser
{
    public Role Role { get; set; }
}
Now we need to add some classes to define the user registration and login requests. Inside the Models folder, create the following three classes:
RegistrationRequest.cs:
using System.ComponentModel.DataAnnotations;
using JwtRoleAuthentication.Enums;

namespace JwtRoleAuthentication.Models;

public class RegistrationRequest
{
    [Required]
    public string? Email { get; set; }

    [Required]
    public string? Username { get; set; }

    [Required]
    public string? Password { get; set; }

    public Role Role { get; set; }
}
Note that if a role isn’t explicitly specified we will default to the user role.
AuthRequest.cs:
namespace JwtRoleAuthentication.Models;

public class AuthRequest
{
    public string? Email { get; set; }
    public string? Password { get; set; }
}
AuthResponse.cs:
namespace JwtRoleAuthentication.Models;

public class AuthResponse
{
    public string Email { get; set; }
    public string Token { get; set; }
}
We also need to model what a page looks like, so in the models folder create Page.cs:
using System.ComponentModel.DataAnnotations;
using System.ComponentModel.DataAnnotations.Schema;

namespace JwtRoleAuthentication.Models;

public class Page
{
    [Key]
    [DatabaseGenerated(DatabaseGeneratedOption.Identity)]
    public int Id { get; set; }
    public string? Title { get; set; }
    public string? Body { get; set; }
    public string? Author { get; set; }
}
And a Data Transfer Object:
namespace JwtRoleAuthentication.Models;

public class PageDto
{
    public required int Id { get; set; }
    public required string? Title { get; set; }
    public required string? Body { get; set; }
    public required string? Author { get; set; }
}
We also want a `PagesDto.cs“ so that we can return a list of pages:
namespace JwtRoleAuthentication.Models;

public class PagesDto
{
    public List<PageDto> Pages { get; set; } = new List<PageDto>();
}
Now that we have our models in place, the next step is to create a TokenService, which allows us to generate the JWT token:
Build the TokenService
using JwtRoleAuthentication.Models;

namespace JwtRoleAuthentication.Services;

using System.IdentityModel.Tokens.Jwt;
using Microsoft.IdentityModel.Tokens;
using System.Security.Claims;
using System.Text;

public class TokenService
{
    // Specify how long until the token expires
    private const int ExpirationMinutes = 30;
    private readonly ILogger<TokenService> _logger;

    public TokenService(ILogger<TokenService> logger)
    {
        _logger = logger;
    }

    public string CreateToken(ApplicationUser user)
    {
        var expiration = DateTime.UtcNow.AddMinutes(ExpirationMinutes);
        var token = CreateJwtToken(
            CreateClaims(user),
            CreateSigningCredentials(),
            expiration
        );
        var tokenHandler = new JwtSecurityTokenHandler();

        _logger.LogInformation("JWT Token created");

        return tokenHandler.WriteToken(token);
    }

    private JwtSecurityToken CreateJwtToken(List<Claim> claims, SigningCredentials credentials,
        DateTime expiration) =>
        new(
            new ConfigurationBuilder().AddJsonFile("appsettings.json").Build().GetSection("JwtTokenSettings")["ValidIssuer"],
            new ConfigurationBuilder().AddJsonFile("appsettings.json").Build().GetSection("JwtTokenSettings")["ValidAudience"],
            claims,
            expires: expiration,
            signingCredentials: credentials
        );

    private List<Claim> CreateClaims(ApplicationUser user)
    {
        var jwtSub = new ConfigurationBuilder().AddJsonFile("appsettings.json").Build().GetSection("JwtTokenSettings")["JwtRegisteredClaimNamesSub"];

        try
        {
            var claims = new List<Claim>
            {
                new Claim(JwtRegisteredClaimNames.Sub, jwtSub),
                new Claim(JwtRegisteredClaimNames.Jti, Guid.NewGuid().ToString()),
                new Claim(JwtRegisteredClaimNames.Iat, DateTimeOffset.UtcNow.ToUnixTimeSeconds().ToString()),
                new Claim(ClaimTypes.NameIdentifier, user.Id),
                new Claim(ClaimTypes.Name, user.UserName),
                new Claim(ClaimTypes.Email, user.Email),
                new Claim(ClaimTypes.Role, user.Role.ToString())
            };

            return claims;
        }
        catch (Exception e)
        {
            Console.WriteLine(e);
            throw;
        }
    }

    private SigningCredentials CreateSigningCredentials()
    {
        var symmetricSecurityKey = new ConfigurationBuilder().AddJsonFile("appsettings.json").Build().GetSection("JwtTokenSettings")["SymmetricSecurityKey"];

        return new SigningCredentials(
            new SymmetricSecurityKey(
                Encoding.UTF8.GetBytes(symmetricSecurityKey)
            ),
            SecurityAlgorithms.HmacSha256
        );
    }
}
Inside this code, you can see how the token is generated. When the CreateClaim() method is called, you can see we pass all the required information including ClaimTypes.Role.
Back to Program.cs
We now want to register our TokenService, and you can do so by adding the following line to the bottom of your Program.cs:
// Register our TokenService dependency
builder.Services.AddScoped<TokenService, TokenService>();
Below that line, add the following code:
// Support string to enum conversions
builder.Services.AddControllers().AddJsonOptions(opt =>
{
    opt.JsonSerializerOptions.Converters.Add(new JsonStringEnumConverter());
});


// Specify identity requirements
// Must be added before .AddAuthentication otherwise a 404 is thrown on authorized endpoints
builder.Services
    .AddIdentity<ApplicationUser, IdentityRole>(options =>
    {
        options.SignIn.RequireConfirmedAccount = false;
        options.User.RequireUniqueEmail = true;
        options.Password.RequireDigit = false;
        options.Password.RequiredLength = 6;
        options.Password.RequireNonAlphanumeric = false;
        options.Password.RequireUppercase = false;
    })
    .AddRoles<IdentityRole>()
    .AddEntityFrameworkStores<ApplicationDbContext>();
Here we add our ApplicationUser role, as well as a default IdentityRole. We can also pass some options to the Identity to enforce password requirements.
Next, let’s add Authentication of type JwtBearer to our Program.cs:
// These will eventually be moved to a secrets file, but for alpha development appsettings is fine
var validIssuer = builder.Configuration.GetValue<string>("JwtTokenSettings:ValidIssuer");
var validAudience = builder.Configuration.GetValue<string>("JwtTokenSettings:ValidAudience");
var symmetricSecurityKey = builder.Configuration.GetValue<string>("JwtTokenSettings:SymmetricSecurityKey");

builder.Services.AddAuthentication(options => {
        options.DefaultAuthenticateScheme = JwtBearerDefaults.AuthenticationScheme;
        options.DefaultChallengeScheme = JwtBearerDefaults.AuthenticationScheme;
        options.DefaultScheme = JwtBearerDefaults.AuthenticationScheme;})
    .AddJwtBearer(options =>
    {
        options.IncludeErrorDetails = true;
        options.TokenValidationParameters = new TokenValidationParameters()
        {
            ClockSkew = TimeSpan.Zero,
            ValidateIssuer = true,
            ValidateAudience = true,
            ValidateLifetime = true,
            ValidateIssuerSigningKey = true,
            ValidIssuer = validIssuer,
            ValidAudience = validAudience,
            IssuerSigningKey = new SymmetricSecurityKey(
                Encoding.UTF8.GetBytes(symmetricSecurityKey)
            ),
        };
    });
Note that order is important here and AddIdentity<>() must come before .AddAuthentication.
Lastly, lets add the remaining code to Program.cs to build and run the app:
// Build the app
var app = builder.Build();


// Configure the HTTP request pipeline
if (app.Environment.IsDevelopment())
{
    app.UseSwagger();
    app.UseSwaggerUI();
}

app.UseHttpsRedirection();
app.UseStatusCodePages();

app.UseAuthentication();
app.UseAuthorization();
app.MapControllers();
app.Run();
Create the ApplicationDbContext
Next, we need to create an ApplicationDbContext so that we can interface with the database:
using JwtRoleAuthentication.Enums;
using JwtRoleAuthentication.Models;
using Microsoft.AspNetCore.Identity;
using Microsoft.AspNetCore.Identity.EntityFrameworkCore;
using Microsoft.EntityFrameworkCore;

namespace JwtRoleAuthentication.Data;


public class ApplicationDbContext : IdentityUserContext<ApplicationUser>
{
    public DbSet<Page> Pages => Set<Page>();

    public ApplicationDbContext (DbContextOptions<ApplicationDbContext> options)
        : base(options)
    {

    }

    protected override void OnModelCreating(ModelBuilder modelBuilder)
    {
        base.OnModelCreating(modelBuilder);
    }
}
Create a Controller to Handle Authorization
Now that we have a TokenService and DbContext configured, the next step is to create a controller to handle user registrations and logins. Inside a Controllers folder, add the following to UserController.cs:
using JwtRoleAuthentication.Data;
using JwtRoleAuthentication.Enums;
using JwtRoleAuthentication.Models;
using JwtRoleAuthentication.Services;
using Microsoft.AspNetCore.Authorization;
using Microsoft.AspNetCore.Identity;
using Microsoft.AspNetCore.Mvc;

namespace JwtRoleAuthentication.Controllers;

[ApiController]
[Route("/api/[controller]")]
public class UsersController : ControllerBase
{
    private readonly UserManager<ApplicationUser> _userManager;
    private readonly ApplicationDbContext _context;
    private readonly TokenService _tokenService;

    public UsersController(UserManager<ApplicationUser> userManager, ApplicationDbContext context, TokenService tokenService, ILogger<UsersController> logger)
    {
        _userManager = userManager;
        _context = context;
        _tokenService = tokenService;
    }


    [HttpPost]
    [Route("register")]
    public async Task<IActionResult> Register(RegistrationRequest request)
    {
        if (!ModelState.IsValid)
        {
            return BadRequest(ModelState);
        }

        var result = await _userManager.CreateAsync(
            new ApplicationUser { UserName = request.Username, Email = request.Email, Role = Role.User },
            request.Password!
        );

        if (result.Succeeded)
        {
            request.Password = "";
            return CreatedAtAction(nameof(Register), new { email = request.Email, role = request.Role }, request);
        }

        foreach (var error in result.Errors)
        {
            ModelState.AddModelError(error.Code, error.Description);
        }

        return BadRequest(ModelState);
    }


    [HttpPost]
    [Route("login")]
    public async Task<ActionResult<AuthResponse>> Authenticate([FromBody] AuthRequest request)
    {
        if (!ModelState.IsValid)
        {
            return BadRequest(ModelState);
        }

        var managedUser = await _userManager.FindByEmailAsync(request.Email!);
        if (managedUser == null)
        {
            return BadRequest("Bad credentials");
        }

        var isPasswordValid = await _userManager.CheckPasswordAsync(managedUser, request.Password!);
        if (!isPasswordValid)
        {
            return BadRequest("Bad credentials");
        }

        var userInDb = _context.Users.FirstOrDefault(u => u.Email == request.Email);

        if (userInDb is null)
        {
            return Unauthorized();
        }

        var accessToken = _tokenService.CreateToken(userInDb);
        await _context.SaveChangesAsync();

        return Ok(new AuthResponse
        {
            Username = userInDb.UserName,
            Email = userInDb.Email,
            Token = accessToken,
        });
    }
}
Note that there isn’t anything special with this controller. The register endpoint creates a new user based on the values specified via POST, and the login endpoint generates a token if the email and password are correct.
Create a Pages Controller
The pages controller will allow users to create new pages, as well as see a list of posts that exist in the DB. Create a PagesController.cs with the following:
using JwtRoleAuthentication.Data;
using JwtRoleAuthentication.Models;
using Microsoft.AspNetCore.Mvc;
using Asp.Versioning;
using Microsoft.AspNetCore.Authorization;
using Microsoft.EntityFrameworkCore;

namespace JwtRoleAuthentication.Controllers;

[ApiVersion( 1.0 )]
[ApiController]
[Route("api/[controller]" )]
public class PagesController : ControllerBase
{
    private readonly ApplicationDbContext _dbContext;

    public PagesController(ILogger<PagesController> logger, ApplicationDbContext dbContext)
    {
        _dbContext = dbContext;
    }

    [Authorize (Roles = "Admin")]
    [HttpPost("new")]
    public async Task<ActionResult<Page>> CreatePage(PageDto pageDto)
    {
        if (!ModelState.IsValid)
        {
            return BadRequest(ModelState);
        }

        var page = new Page
        {
            Id = pageDto.Id,
            Title = pageDto.Title,
            Author = pageDto.Author,
            Body = pageDto.Body,
        };

        _dbContext.Pages.Add(page);
        await _dbContext.SaveChangesAsync();

        return CreatedAtAction(nameof(GetPage), new { id = page.Id }, page);
    }


    [HttpGet("{id:int}")]
    public async Task<ActionResult<PageDto>> GetPage(int id)
    {
        var page = await _dbContext.Pages.FindAsync(id);

        if (page is null)
        {
            return NotFound();
        }

        var pageDto = new PageDto
        {
            Id = page.Id,
            Author = page.Author,
            Body = page.Body,
            Title = page.Title
        };

        return pageDto;
    }


    [HttpGet]
    public async Task<PagesDto> ListPages()
    {
        var pagesFromDb = await _dbContext.Pages.ToListAsync();

        var pagesDto = new PagesDto();

        foreach (var page in pagesFromDb)
        {
            var pageDto = new PageDto
            {
                Id = page.Id,
                Author = page.Author,
                Body = page.Body,
                Title = page.Title
            };

            pagesDto.Pages.Add(pageDto);
        }

        return pagesDto;
    }
}
What’s important to take note of here is the attribute above the create endpoint: [Authorize (Roles = "Admin")]. This specifies that a user must pass a JWT bearer token, and inside the token there should also be a Role parameter. If we just specified [Authorize], then any user who passes a bearer token can access the endpoint.
Running the Project
In order to run the project, you’ll need Postgresql installed, and for this I use Docker. With docker installed, run:
docker run --rm -P -p 127.0.0.1:5432:5432 -e POSTGRES_PASSWORD="devpass" --name postgres postgres:alpine
Next, add an EF Core migration to build the database:
dotnet ef migrations add Initial --output-dir Data/Migrations
and update:
dotnet ef database update
Now run your project, and you should see Swagger appear with your list of endpoints:
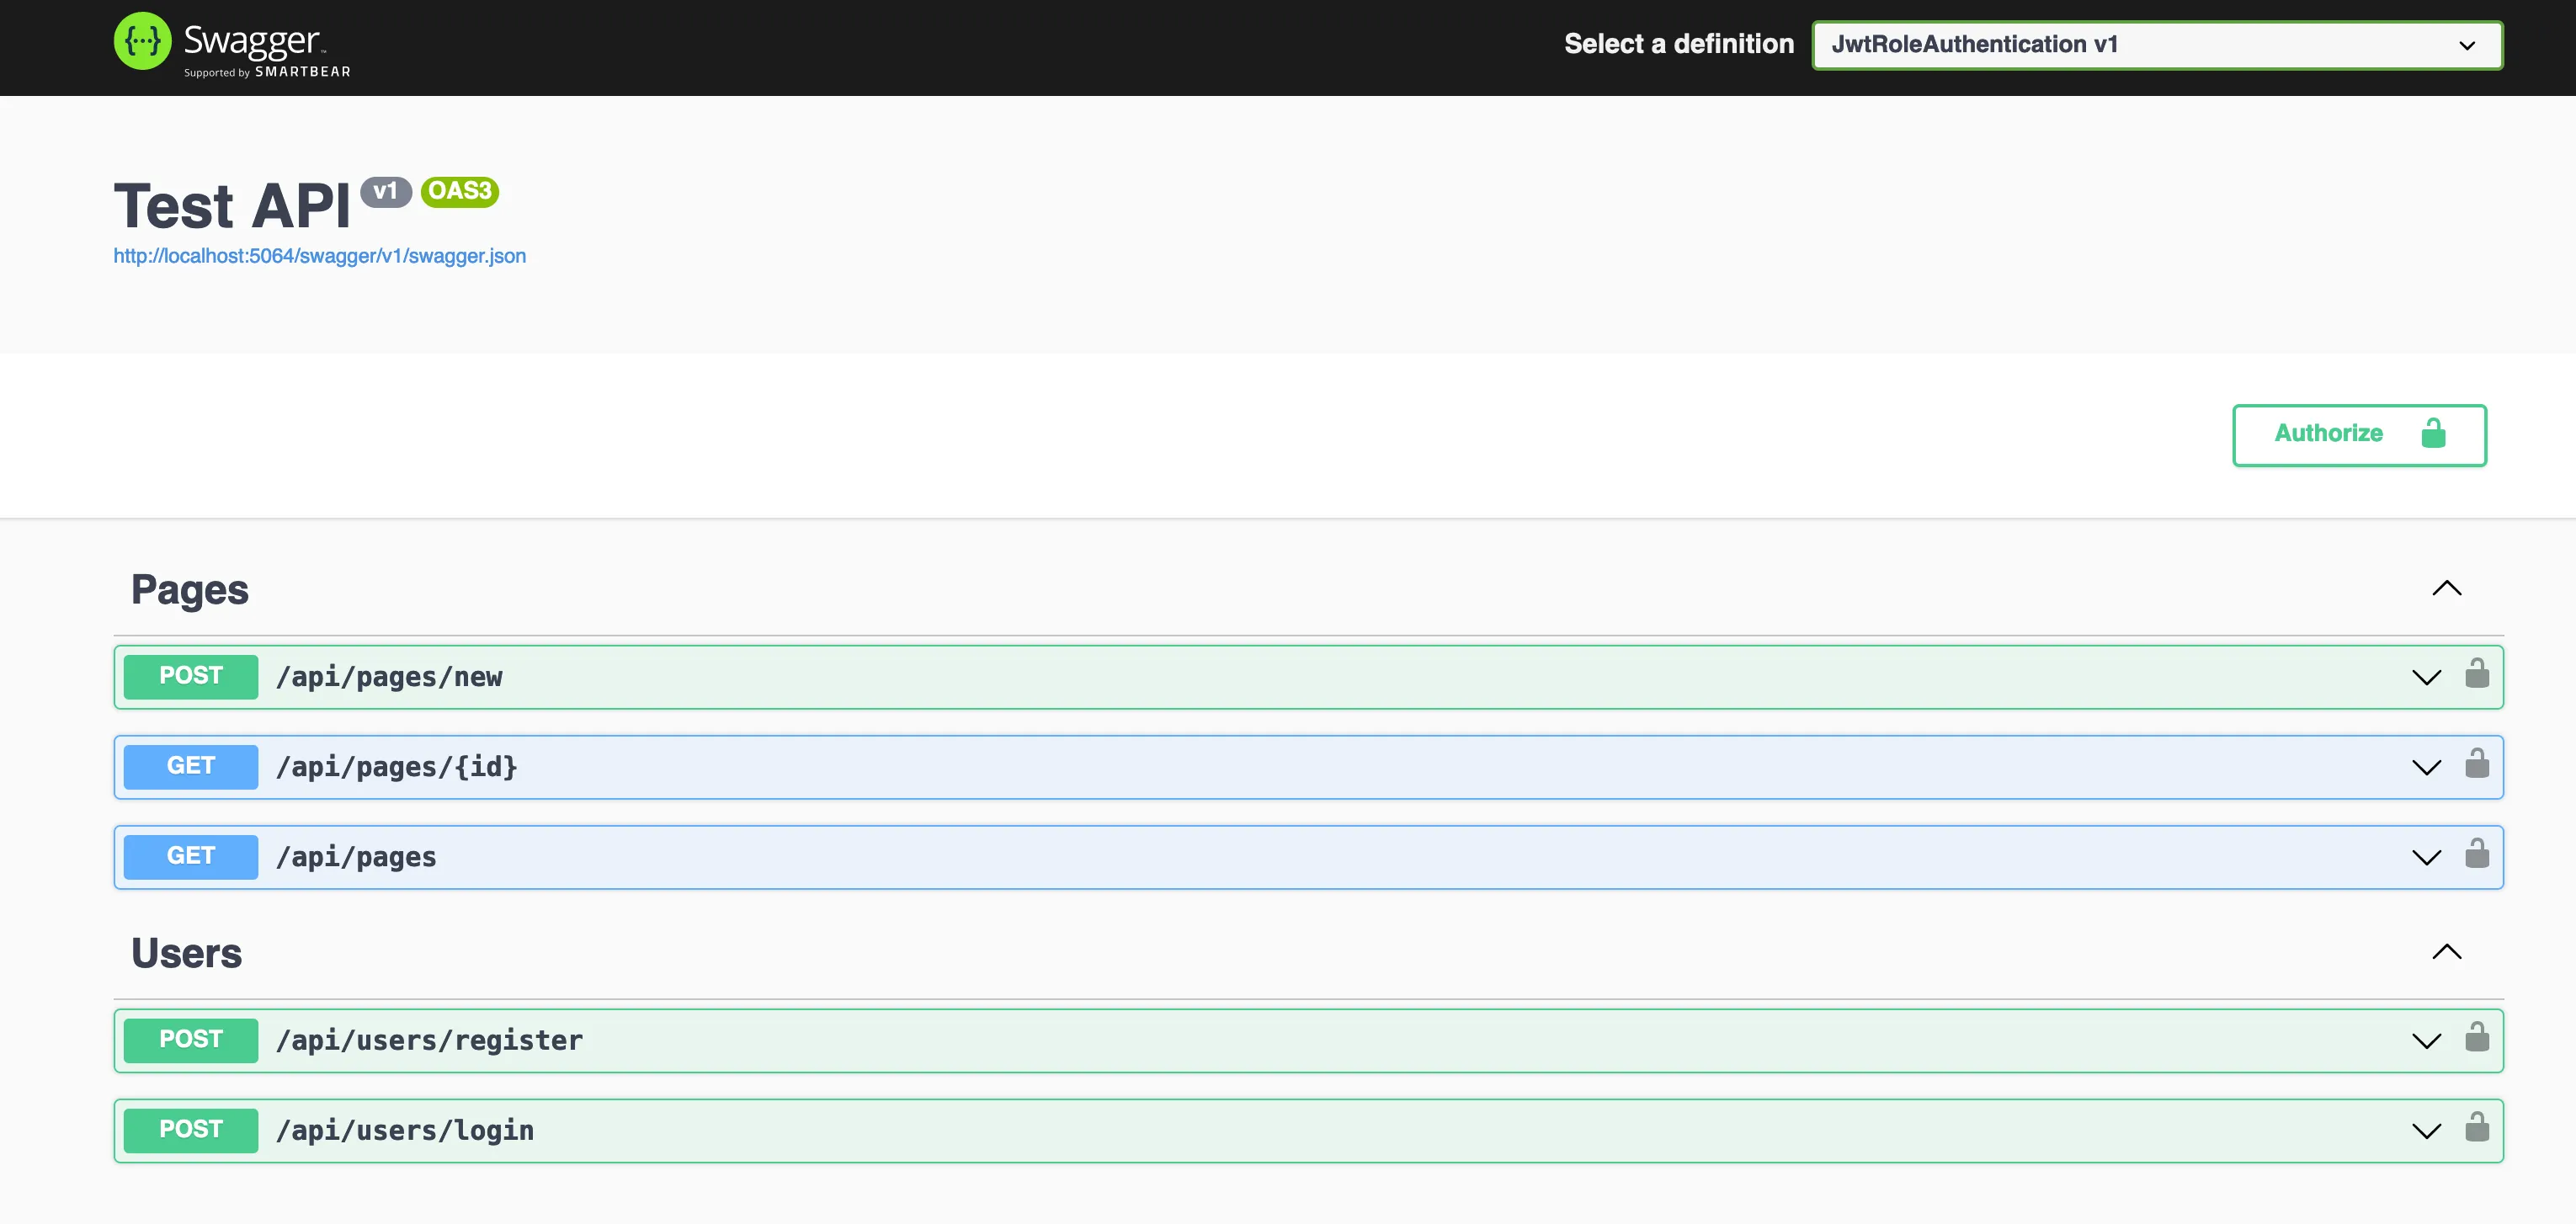
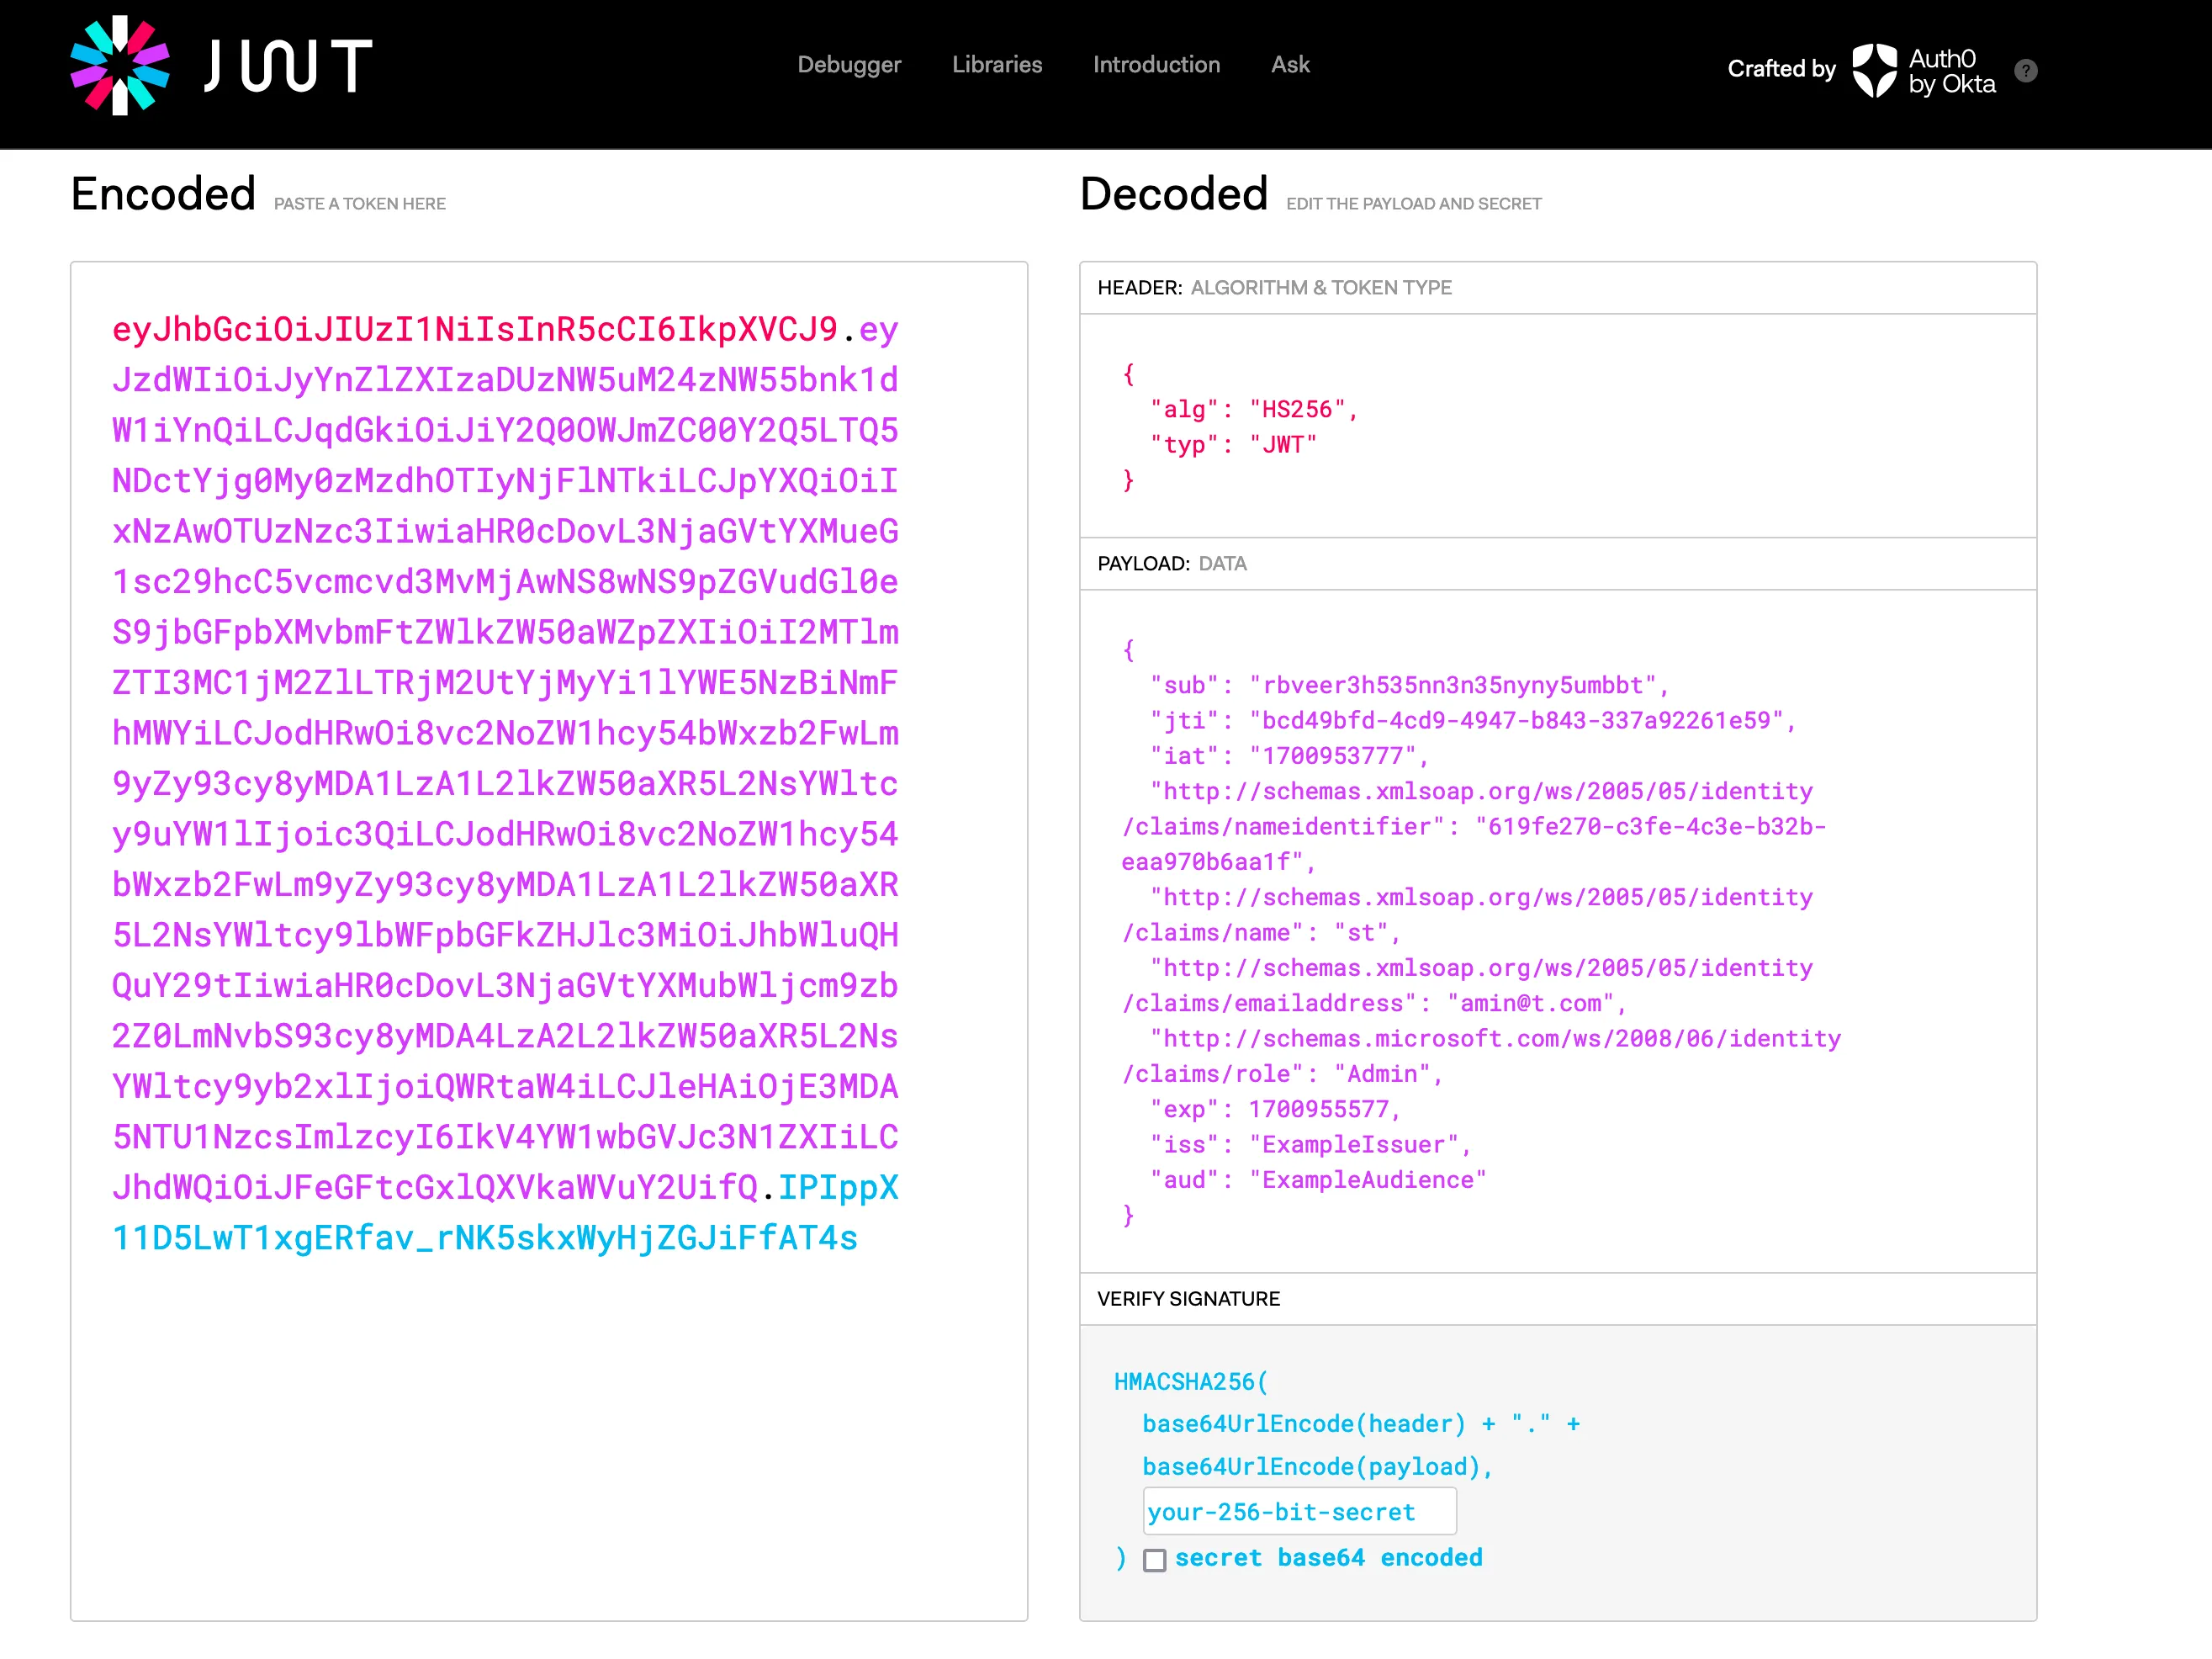
You can now create an account, login to get a bearer token, and then access the /api/posts/create method! When you examine the decoded token, you should see Admin for the role:
Adding a Default Admin User
For security purposes, you may want to lock down the register endpoint so that only admins can create new users. In order to seed your DB with a default admin user, update the OnModelCreating() method inside ApplicationDbContext:
protected override void OnModelCreating(ModelBuilder modelBuilder)
{
    base.OnModelCreating(modelBuilder);

    // Seed AspNetUsers table with default admin user
    var hasher = new PasswordHasher<ApplicationUser>();

    var adminEmail = new ConfigurationBuilder().AddJsonFile("appsettings.json").Build().GetSection("SiteSettings")["AdminEmail"];
    var adminPassword = new ConfigurationBuilder().AddJsonFile("appsettings.json").Build().GetSection("SiteSettings")["AdminPassword"];

    modelBuilder.Entity<ApplicationUser>().HasData(
        new ApplicationUser
        {
            Id = "80c8b6b1-e2b6-45e8-b044-8f2178a90111", // primary key
            UserName = "admin",
            NormalizedUserName = adminEmail.ToUpper(),
            PasswordHash = hasher.HashPassword(null, adminPassword),
            Email = adminEmail,
            NormalizedEmail = adminEmail.ToUpper(),
            Role = Role.Admin
        }
    );
}
Conclusion
As you can see, setting up JWT role-based authorization in ASP .NET Core 8 isn’t trivial, but it isn’t super difficult either once you understand the concepts. From here, you’ll want to look into using refresh tokens and think about setting up a more robust permissions structure. Also, don’t forget to check out my example repository to see the final implementation. Lastly, if you have any questions, don’t hestiate to contact me or leave a comment!
